
|
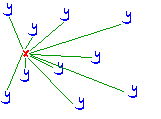
As you will notice with
X standing still it is very easy for Y to keep his weapon aimed at X but difficult for X
to keep a bead on Y. This is because Y is going through a much larger field of motion,
while X is staying still. |
|
Strafing |
Strafing is one of the most important skills
to learn. It is more of a matter of learning when to strafe rather than how to strafe.
Strafing allows you to side step instead of having to stand there and pivot like a turret.
Strafing makes hitting you much more difficult and is extremely useful for covering
corners. |

|
Y moves continually
around X keeping his aim dead on X. Y is always facing X and firing at X. X will attempt
to stay with Y but will end up spinning around, possibly inducing motion sickness on X. Y
can also switch the direction of rotation of X at any time. |
|
Circle Strafing |
A step up from the normal strafing techniques.
This requires you to strafe in a circle by keeping your sight continuously on one point.
Circle strafing works very well because for the target it is nearly impossible to keep a
bead on the attacker as he/she keeps going to their side or back and fires. The only real
way to counter is to move forward or backwards, or to start circle strafing yourself. |
|
With use of just the
forward and back movement keys Y can fire from all of these positions and more. If Y just
keeps moving from positions to position X is in danger of taking damage. This is basically
a "Hit and Fade" style attack, but instead of disappearing Y is staying to duke
it out with X. Using only the movement keys isn't extremely effective, but it does keep
you as a moving target. |
|
Forward Movement |
This is just how you move your character
forward. Unfortunately some people don't understand how to do it entirely correctly. They
get the basics of how to move in a straight line, but more complexity just isn't grasped.
That is basically to keep moving while firing, don't just stop and unload your backpack.
Keep it moving so you don't get gibbed, or at least so you can stand a little more of a
chance. Don't move forward however if you are just gonna eat a rocket. |
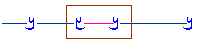 |
This is what we like to
call a "Six check" the title originates from fighter pilots in the first and
second World Wars. All it consists of is turning around to see if any one is on your tail.
The area in the box it the check. As Y turns around Y will begin to use the backwards
movement key (indicated bye the magneta colored line) instead of the forward movement key
(indicated with the dark blue line) to continue in the intended direction. After scanning
for a second Y will spin around again and use the forward movement key once again. |
|
Backwards Movement |
Would you drive your car down a busy street in
reverse while looking through the front wind shield? No, I should hope not. Now why would
you do that in Quake 2? You will just back into rockets and stuff. Don't over use the
backwards movement. It is great for "Hit and Fade" techniques, checking your
six, and for dodging, but running backwards is just stupid. To check your six just flip
around 180 degrees and start using back, look for a second, flip back around and start
using forward again. Only run backwards if you don't want to see death coming. |

|
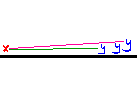
This image demonstrates
the 2 best ways of cornering. The blue lined turn is the easiest to perform. All Y has to
do is turn 90 degrees, strafe around the corner and Y has a clear line of sight. The
magneta line is the harder and more complex way of turning the corner but can be more
effective. It is more effective because you perform it similar to the first one except the
forward movement key is used and this will allow you to converge on you enemy. Y comes up
close to the inside wall of the corner and turns less than 90 degrees, about 60 or 70 and
as Y gains line of sight down the hallway Y will begin to use the forward movement key. It
is harder to but convergence on the enemy is easier. Both are effective and both yeild the
same firing solution, it is just a matter of which one you are most comfortable with. |
|
Cornering |
There are about 3 ways to do this. A right
way, another right way, and a way to die. The preferrable way to turn a corner is to
strafe around it and then start to use the forward key. The other right way is to just use
forward and quickly turn to face down the hall. The way to die is to use the second
technique but to turn slowly or to get stuck on a wall. Cornering shouldn't be too hard
for the vast majority. |

|
Jumping over rockets
takes alot of practice, timing, and luck. All it is basically is a nicely timed jump, too
soon the rocket nails Y on the way down, jump too late and Y gets his legs blown off. Y
jumps while moving forward toward the rocket and while in the air or after Y has landed Y
will fire on X. Firing in the air is adventageous because it will hurt X and force him to
move allowing you to get more shots off. If you are fighting an enemy with Time Accel it
is possible to jump the first rocket but to dodge the next one is impossible because you
get hit as you land. This is also a demonstration of how to throw off someone's aim, just
jump around like an idiot (but a living idiot that is). |
|
Jumping |
Jumping may be your most potent weapon against
railguns and rockets. Jumping while fighting an enemy seems to confuse them and cause them
to over correct which will make them miss. Especially effective against the Railgun
because of its slow reload. The other thing you can do with jumping is rocket hopping. You
can jump right over the rockets with good timing so that they pass harmlessly, just like
gas. Also alot of stuff can't be accessed without the use of jumping. Don't just run
around like you have lead boots on, Carmack gave us a jump key so use it! |
|
The hardest to survive
and least used dodging technique used simply because over used it is ineffective. First
off you have to notice that your opponent is starting to aim high and jumping is now
ineffective. Y just lets X fire and a second before the rocket impacts he ducks and
returns fire. Don't duck immediately in case your opponent can get another shot off and
hit you as you crouch. Since you move slower when you crouch use this move sparingly. |
|
Crouching |
Although not quite as effective as jumping
crouching is often neglected. Crouching is what you do once your opponent has figured out
that you are jumping around and starts to aim higher. He goes higher, you go lower. Once
you start to crouch he will again aim down, then you start to jump again. Another good
tactic is to crouch in the shadows because you are minimizing the amount of your model
that can be seen. It can give you that little edge that could pay off hugely. |